Writing Whole Notes

Writing Notes (especially writing Whole Notes) can be tricky for Students. What they see on the printed page of music is not exactly what they write (or what they are expected to write).
Music that is typeset has a different appearance from music that is written by hand. When writing whole notes, we are not expected to make the whole notes look exactly like they appear in printed music.
This Blog will explore what is correct (acceptable) and what is incorrect (unacceptable) when writing whole notes by hand (versus what you "see" in printed music).
So how do we make Writing Notes super easy for all students? Let's look at 3 Easy Rules for writing whole notes and a game that you can play with your students to help them understand the placement of the Notehead (that oval/circle part of the note).
Writing Whole Notes - What you SEE is not always what you WRITE
What the students SEE is not always how the students WRITE the notes. So, when writing whole notes, how do you explain the difference to your students?
Students are not expected to be "typesetters". But what is considered Correct and what is considered Incorrect?
First of all, that "circle" part of the note is called the Notehead (or Note Head). The placement of the Notehead defines whether the Note is written on a line or in a space.
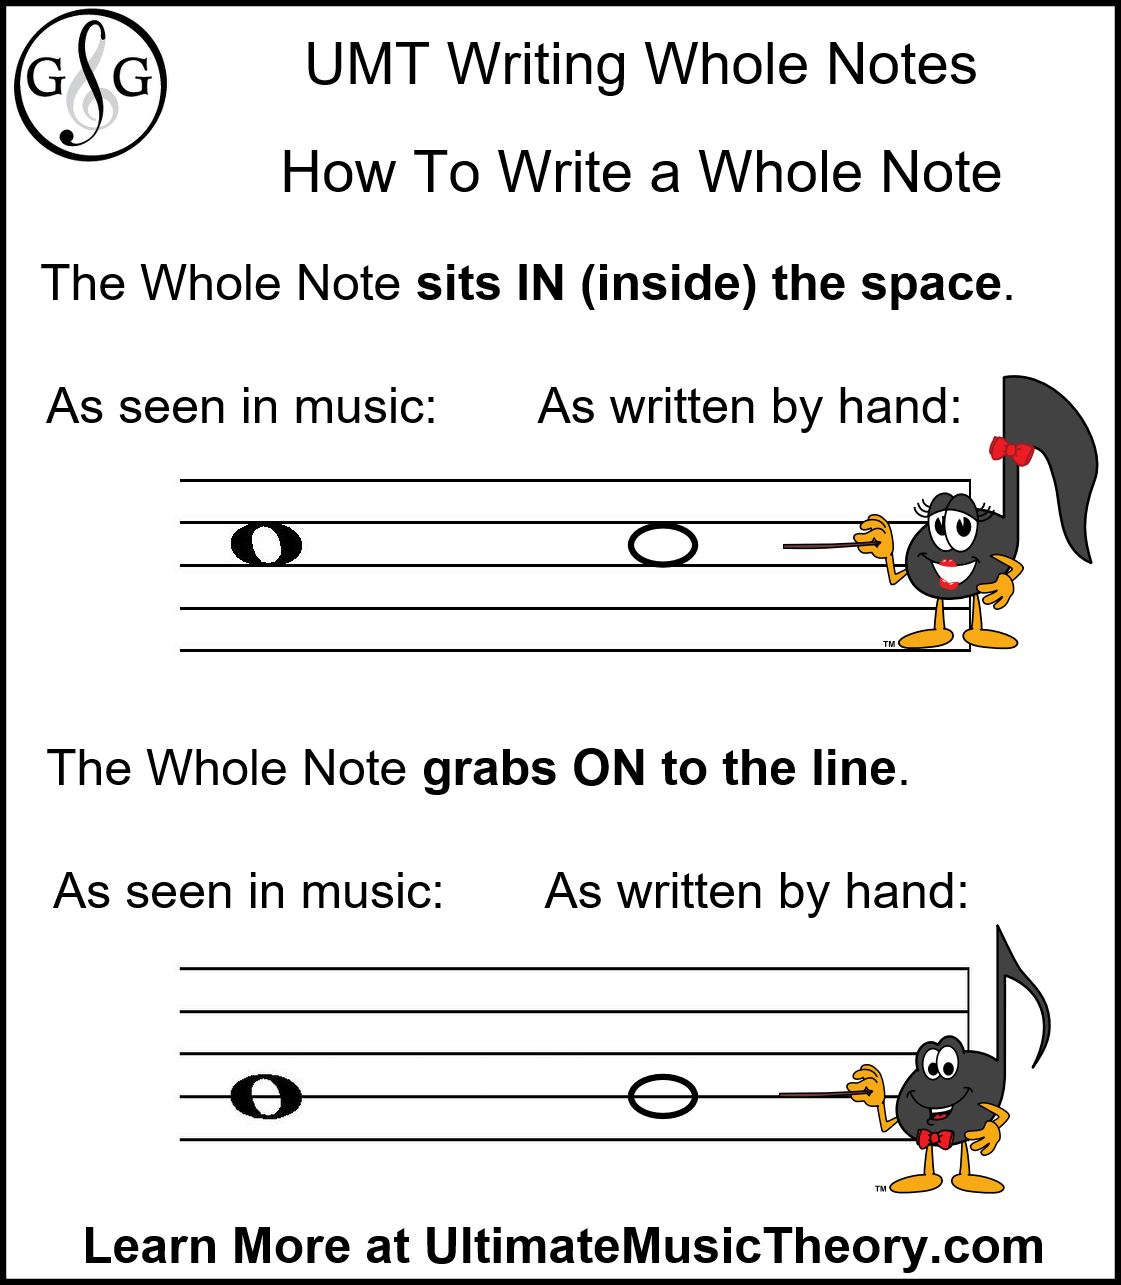
When a note is written on a line, the line must go in the middle of the notehead. When a note is written in a space, the notehead sits in the space (and does not extend outside of that space).
Here are 3 Easy Rules:
Writing Whole Notes Rule #1: The Notehead is written as an oval. That's it. No "shading" - just a simple oval (or "flat circle").
Writing Whole Notes Rule #2: The "middle" of the Notehead is either written on a line or it is written in a space.
- On a Line: the line runs through the middle of the Notehead, with half of the Notehead written in the space above the line and the other half in the space below the line.
- In a Space: the Notehead sits in between the 2 lines (sitting "inside" the space, touching but not extending past either line).
Writing Whole Notes Rule #3: The size of the Notehead (the oval) is the same size as a space in the Staff.

The Ultimate Music Theory Student Whiteboard is a great tool for practicing writing whole notes. It is so simple to erase if you make a mistake. The small size makes it easy for Students to practice without feeling overwhelmed.
I have several students who have "perfectionist tendencies" (just like I do). So we explore what shape a Whole Note takes. What is the difference between a "circle" and an "oval"? The Whole Note is kind of "in between" both of these shapes.
So, just like Goldilocks and the 3 bowls of porridge, we don't want the Whole Note to be "too round" or "too flat". We want the Whole Note to be "just right". I remind them that I am not going to take a magnifying glass and a measuring tape to examine the Whole Note. I just want them to do their best when writing notes. (It needs to look like a Whole Note.)

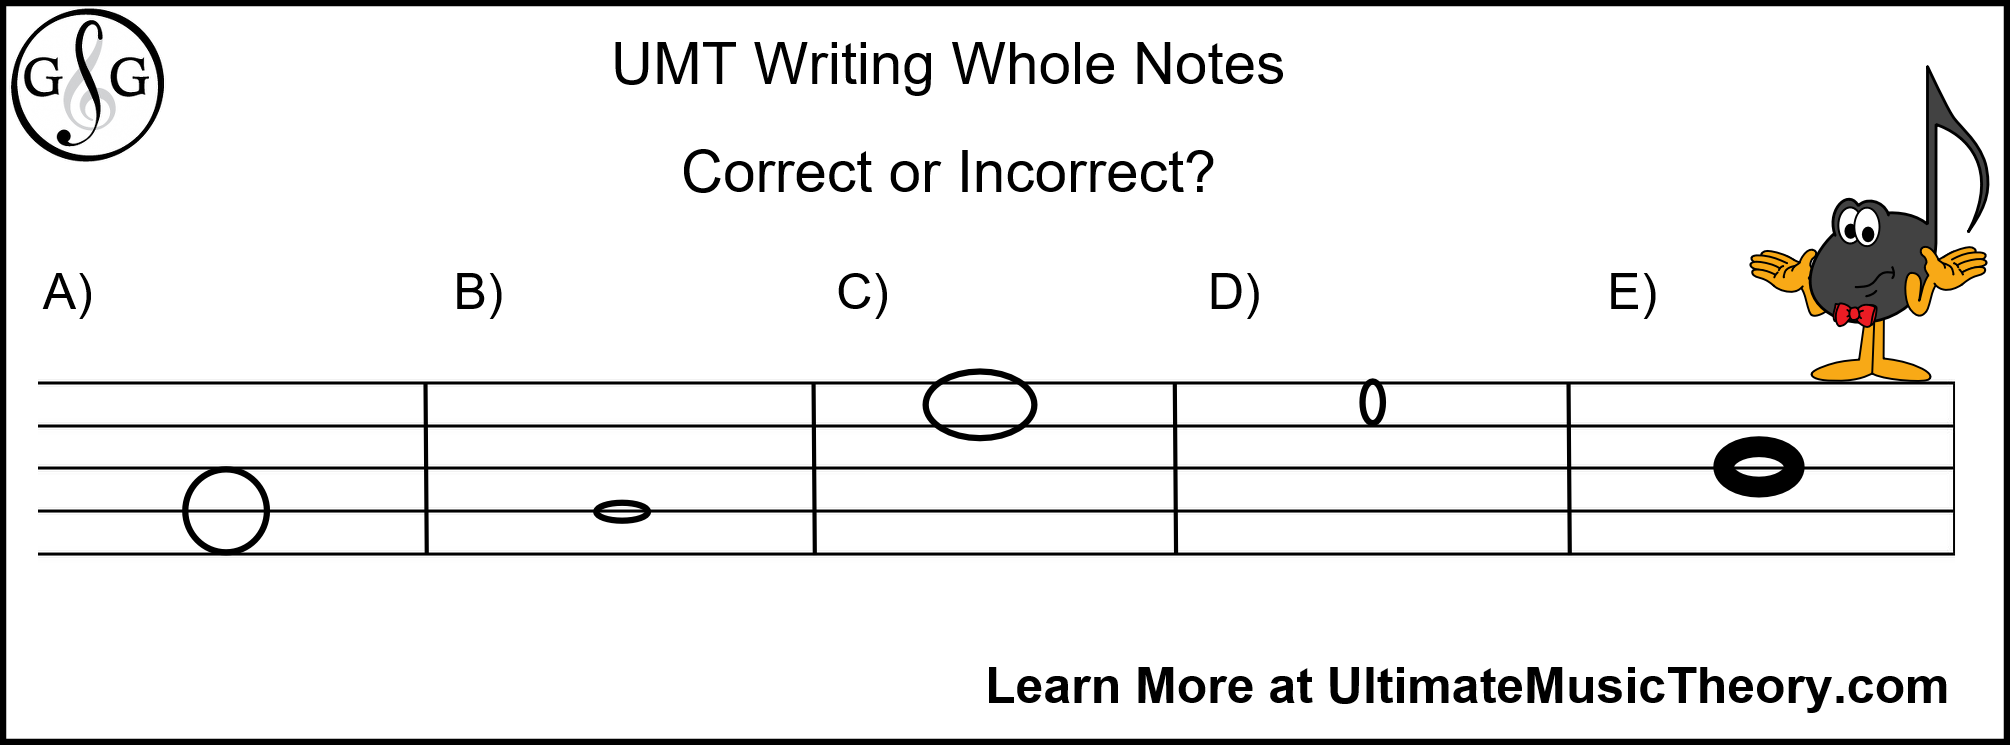
Let's take a look at the above 5 Examples of Writing Whole Notes. Are they Correct or Incorrect?
Example A: Incorrect. This notehead is too big. Although the notehead is written "on line #2", it is also touching Line #1 and Line #3. (My student says that it is also too much of a "circle" and not as much of an "oval" as it should be.)
Example B: Incorrect. This notehead is too small (and too flat). Even though you can "see" that the notehead is written "on the line", if you were to move that notehead to a space, the notehead would be much smaller than the space. (A notehead must be the same "size" as a space.)
Example C: Incorrect. While this notehead is a nice "oval" shape, the notehead is definitely too big (it extends past line #3 and line #4). As a space note (in space #4), the oval should touch line #3 on the bottom and line #4 on the top. It should not extend past either of these lines.
Example D: Incorrect. This notehead is too "tall". While it does stay within space #4, it is obvious that this oval is too tall.
Example E: Incorrect. This notehead is too "thick". The line of the oval has been shaded too dark, and you can hardly see the middle "space" of the notehead.
Writing Whole Notes - How to Write a Whole Note
First of all, have you checked out the Ultimate Music Theory Beginner A, B, C Series? This series actually teaches students HOW to write notes!
One feature in this Series that I absolutely love (one of many) is that we use "as seen in music" versus "as drawn by hand" comparisons. Students can then look at what a concept will look like in written music when typeset BUT will find out - step by step - how they will actually draw (write) the concept when they put their pencil to the paper.
Writing Whole Notes on lines or in spaces is taught in the Music Theory Beginner A Workbook, beginning on Page 46.
In the Music Theory Beginner A Workbook, page 52 teaches students how to actually draw (write) a Treble Clef Sign. Then, on page 62, students learn how to draw (write) a Bass Clef Sign.
I have found that my students (especially my young 4-5 year old students) sometimes struggle with how to understand what it means to "write on the line".
Why? Well, when they are instructed in school to (for example) "write your name on the line at the top of the page", they write (print) their name on "top" of the line (the line is below their written name). But when we instruct them in music to (for example) "write a whole note on Line 3", they write (print) the whole note with the third line going through the middle of the note (and not with the note sitting on "top" of Line #3).
This can be confusing, especially for students who are learning to "write" in school and how to "write" in music!


Writing Whole Notes: The Finger Lines and Spaces Game
Ti-Do Tip: To help my students understand this difference, I add the descriptive words "Sits Inside" and "Grabs On To". We play a little game:
The Teacher holds up one hand vertically, fingers spread open. Hint: if using your Left Hand, be certain that the thumb - finger #1 - is on the bottom; if using your Right Hand, be certain that the thumb - finger #1 - is on the bottom. This is very important. We need to keep reinforcing with young students that the "Thumb is Finger #1". By counting the Thumb as "Line #1", this is another way for students to make that connection.
I like to "rap" with my students that "The Thumb is Number 1! The Thumb is Number 1!" while holding up our Finger #1's (the thumb). Now, try to hold up your baby (pinkie) finger and say "I'm Number 1". It just doesn't work. I do find that this "The Thumb is Number 1" rap reminds my students of that important finger number.
Now that you have established that the Thumb, Finger #1, is the lowest finger of the 5 outstretched fingers, count the fingers (from the bottom to the top).
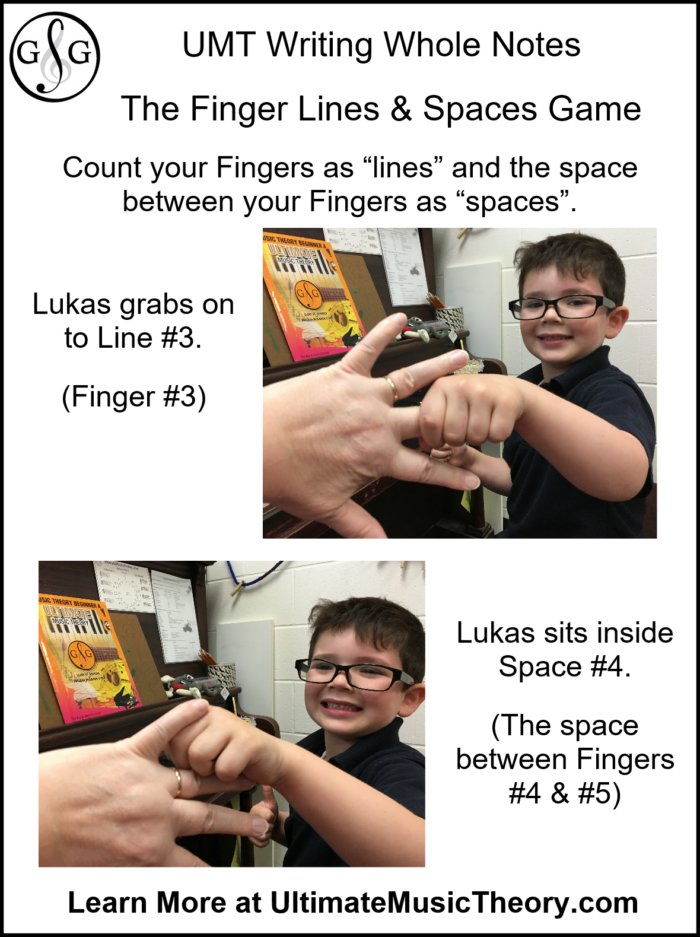
Ask the student to "grab on to finger #1"; then ask them to "grab on to" the different fingers. When they "grab on to" a finger, their hand surrounds the Teacher's finger. The Teacher's finger is in the middle of the student's hand - just like the line is in the middle of the notehead.
Then explore the spaces in between the Teacher's outspread fingers. There is a space in between each of the 5 fingers. There are 4 spaces between the 5 fingers. But there is also a space BELOW finger #1 and a space ABOVE finger #5.
Ask the student to put their hand "inside the space above finger #1". Which space is this?
Explore the difference between grabbing on to a finger (line) and sitting in (inside) the space between the fingers.
Once you have played the Fingers Lines and Spaces Game, take it to the Whiteboard! Match the Students outstretched fingers against the lines and spaces of the Staff on the Whiteboard. Can they point to Finger #3 and then Line #3 on the Staff? Can they point to Space #4 (between Fingers #4 & 5) and Space #4 on the Staff?
Take this Game to the next Level! Have your Students draw a Whole Note on a line or in a space as you call out the Line or Space Number.
See? Playing Games makes learning FUN!
And it is Super Simple to understand the difference between writing whole notes ON a line or IN a space.
If you struggle with Students understanding a concept or a "how to", please email me at Shelagh@UltimateMusicTheory.com - I am always looking to support Teachers with specific Blogs!
Ultimate Music Teachers Membership
♪ LEARN ♪ PLAN ♪ TEACH ♪ GROW
The One & ONLY Ultimate Music Teachers Membership
To Become A UMT PRO!
Your Success Path Starts Here - Go To TeachUMT.com Today!
Keep on Learning... With a Smile and a Song!
Shelagh McKibbon-U'Ren


