Adding Beams To Join 3 Notes

Are there Rules for Adding Beams to Join 3 Notes?
In my blog "Add Beams to Join 2 Notes", we looked at how easy it is adding beams to join 2 notes.
Adding beams is based upon the stem direction and the contour of the notes.
We discovered how to angle the beam and lengthen any necessary stems.
But what happens when we add another note?
Guess what - we follow the same steps!
Steps to Adding Beams (when there are 2 OR 3 notes):
Here are the 3 Easy Steps to Adding Beams (when there are 2 or 3 notes):
- Step #1: Identify the note furthest away from the middle line. Add a stem to each note in that direction. All stems will be approximately one octave long.
- Step #2: Identify the Contour of the notes and the Beam Angle (for the Tilt or Slant of the Beam). Add the Beam from either the highest note (for stems up) or the lowest note (for stems down). Your Beam can only be angled to the distance of one staff space.
- Step #3: Lengthen any stems as necessary to meet the Beam.
Again, please note that these are "GENERAL Rules" and, as always happens, there will be exceptions to the rules. Use these rules as guidelines for adding beams.
Let's prove that we follow these same 3 Easy Steps to adding beams when there are 3 notes!
Adding Beams Pop Quiz:
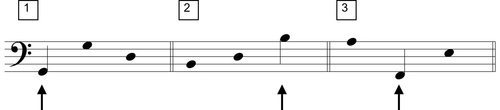
Here are some noteheads.

Are you ready to follow a step by step process to adding beams to create 3 beamed eighth notes in each measure? I am! Let's go!
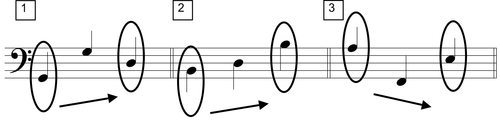
Adding Beams Step #1
Step#1 says: Identify the note furthest away from the middle line. Add a stem to each note in that direction. All stems will be approximately one octave long.
Here are the notes that are the furthest away from the middle line. (Did you pick the same notes?)
So let's add our stems in the direction of these notes. Remember that all stems at this step will be approximately one octave long.

Adding Beams Step #2
Step #2 says: Identify the Contour of the notes and the Beam Angle (for the Tilt or Slant of the Beam). Add the Beam from either the highest note (for stems up) or the lowest note (for stems down).
To identify the contour, look at the pitch direction of the first note to the final note. Is that pitch ascending, descending or horizontal (the same pitch)? That will identify the contour of the notes.
In measure #1, the contour is ascending. In measure #2, the contour is ascending. In measure #3, the contour is descending. This will then become the direction of the Beam Angle (the tilt or slant of the beam).
Next - if the stems are up, find the highest note. That note will have the "shortest" stem (the one octave length stem), so that is where you are going to start your beam angle.
If the stems are down, find the lowest note. That note will have the "shortest" stem (the one octave length stem), so that is where you are going to start your beam angle.
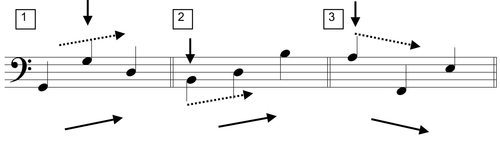
Remember that your beam can only angle to the distance of one staff space, so be careful!
Adding Beams Step #3
Step # 3 says: Lengthen any stems as necessary to meet the Beam.
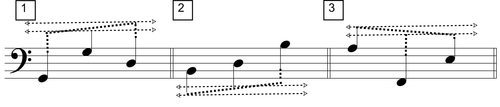
Notice that your "shortest" note still has a one octave stem! Double check that your Beam Angle is only slanted or tilted within the "one staff space" rule. (So, if you notice that your beam is angled too steeply, please adjust it!)
Adding Beams - The Final Finale Product
And here we have the unedited Finale showing how the computer program added the beams.
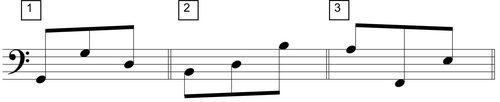
We sure did a great job, didn't we! Wasn't that fun!

Ultimate Music Theory Certification Elite Educator Program - Online Teacher Training to Elevate Your Income, Impact Your Teaching and Grow Your Expert Music Teaching Business. Get Certified!
Click HERE to discover what you will learn in the Ultimate Music Theory Certification Course. Your professional development Online Teacher Training starts here!
Keep on Learning... With a Smile and a Song!
Shelagh McKibbon-U'Ren